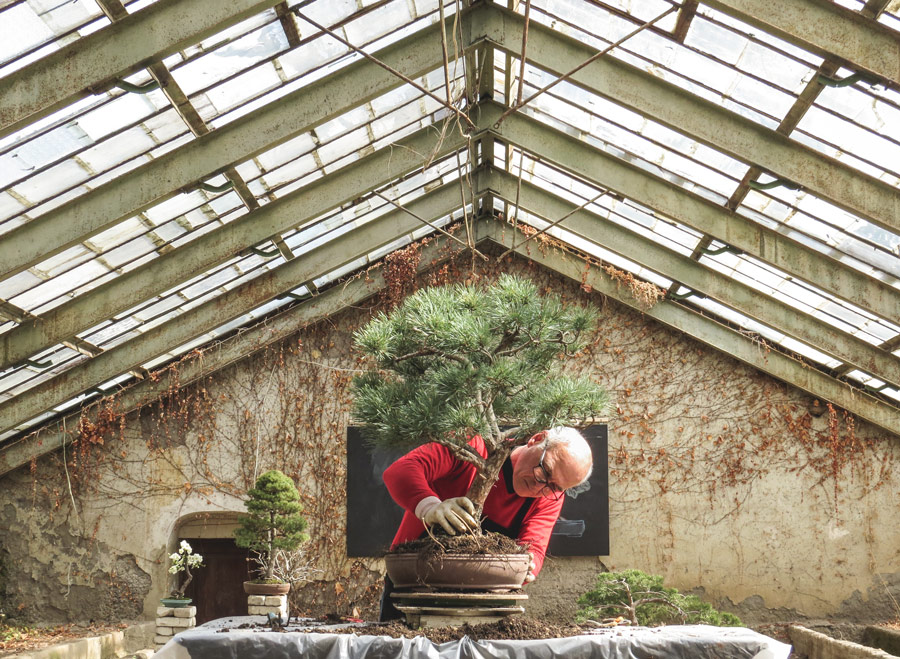
The first planting in the container
დიდი ჭურჭლიდან ან გრუნტიდან კონტეინერში პირველად გადარგვა ერთი შეხედვით არც თუ ისე რთულია, მაგრამ ჩვენ საქმე მინიატურულ მცენარესთან გვაქვს, რომლის თითოეულ პატარა დეტალსაც კი გადამწყვეტი მნიშვნელობა აქვს. გადარგვის დაწყებამდე უნდა შევარჩიოთ შესაფერისი კონტეინერი და უნდა ვიცოდეთ რა რაოდენობის ფესვების შეკრეჭა მოგვიწევს, რომ ნერგი ზუსტად ისე მოთავსდეს კონტეინერში როგორც ჩავიფიქრეთ. ძალიან ხშირად, კონტეინერში პირველად გადარგვის დროს, ყველაფერი ზუსტად ისე არ გამოდის როგორც დაგეგმილი იყო. შესაძლოა ვერ მოხერხდეს საჭირო რაოდენობის ფესვების შეკრეჭა კონტეინერში მოსათავსებლად, ან მიხვდეთ რომ ლამაზი ბონსაის მისაღებად საჭირო ხდება მცენარის ფორმის და ზომის სერიოზული კორექტირება. ყოველივე ამისთვის მზად უნდა იყოთ, ეცადეთ მოძებნოთ შექმნილი სიტუაციიდან ოპტიმალური გამოსავალი.
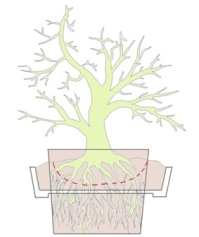
გადარგვის დასაწყებად მოვამზადოთ შესაბამისი კონტეინერი, საჭირო რაოდენობის მიწა, ინსტრუმენტები და დამხმარე მასალები. პირველ რიგში, მორწყვისას მიწა რომ არ გამოირეცხოს, კონტეინერის სადრენაჟე ხვრელები უნდა დაიფაროს მეტალის ან პლასტმასის წვრილი ბადით. კონტეინერის მიწით შევსებისას ბადე თავის ადგილიდან რომ არ დაიძრას, საჭიროა დავაფიქსიროთ მავთულის საშუალებით.

გადარგვის შემდეგ, სანამ მცენარე კარგად გაფესვიანდება, აუცილებელია ბონსაი მყარად დამაგრდეს კონტეინერში. ამისათვის, სადრენაჟე ნახვრეტებში ქვემოდან ამოვუყაროთ მავთული, რომლის მეშვეობითაც ახალგადარგულ მცენარეს დავაფიქსირებთ. ეს მავთული მხოლოდ დროებით კეთდება, როდესაც მცენარე კარგად გაფესვიანდება, მავთული უნდა მოვხსნათ. თუ სადრენაჟე ხვრელი მხოლოდ ერთია, ან ჩათვლით რომ სადრენაჟე ხვრელებიდან ვერ შეძლებთ მავთულის თქვენთვის საჭირო პოზიციაში გატარებას, მაშინ უმჯობესია დასაფიქსირებელი მავთულისთვის, კონტეინერში, დამატებითი პატარა ხვრელები გაკეთდეს. ამის შემდეგ, კონტეინერის ფსკერზე 1-1.5 სანტიმეტრის სიმაღლეზე ვყრით წვრილ ღორღს, დრენაჟის გასაუმჯობესებლად და მხოლოდ ამის შემდეგ მიწის პირველი ფენას.
შემდეგი ეტაპი: ვირჩევთ ადგილს კონტეინერში, სადაც მცენარე უნდა მოთავსდეს. მართკუთხა და ოვალური კონტეინერში მცენარე ირგვება კონტეინერის სიგრძის 1/3-ის და სიგანის 1/2-ის გადაკვეთის წერტილში. სტილი SHAKAN-ის შემთხვევაში, დახრა უნდა იყოს კონტეინერის 2/3-ს მხარეს. სტილებში CHOKAN და MOYOGI ქვედა, ყველაზე გრძელი ტოტი უნდა განთავსდეს კონტეინერის სიგრძის 2/3 ნაწილის ზემოთ.
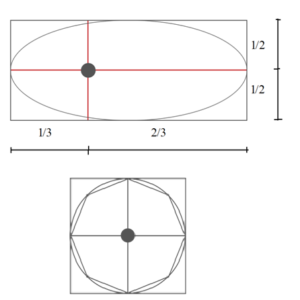
მრგვალ, მრავალ-კუთხა და კვადრატულ კონტეინერში მცენარე თავსდება ცენტრში. ბონსაი ცენტრში ირგვება აგრეთვე მაღალ კონტეინერში, HAN-KENGAI და KENGAI სტილების შემთხვევაში
როდესაც გადარგვას დაგეგმავთ, აუცილებლად გაითვალისწინეთ გრუნტის ტენიანობა, რომელშიც მცენარეა ჩარგული. ცუდია როდესაც გრუნტი ძალიან სველია. ასეთ დროს საკმაოდ რთულია ფესვებიდან ზედმეტი მიწის მოშორება. ამიტომ, გადარგვის, წინ რამდენიმე დღე, ეცადეთ მცენარე არ მორწყათ. გადარგვა, როგორც წესი, სიმშვიდის პერიოდში ხდება და მცენარეს არანაირი ზიანი არ მიადგება თუ მას რამდენიმე დღის განმავლობაში არ მორწყავთ.
როგორ ამოვიღოთ მცენარე დიდი ჭურჭლიდან. პირველ რიგში შეაჭერით ის ფესვები რომლებიც მიწის ბოლქვის გარეთ არის გამოსული. შემდეგ დაიწყეთ მიწის მოშორება. ამისთვის გამოიყენეთ სამკაპა და წაწვეტებული ჯოხი. წაწვეტებული ჯოხი ადგილ-ადგილ ზემოდან ჩაარჭვეთ მიწაში. ამით მიწას ნელ-ნელა გააფხვიერებთ, რაც საშუალებას მოგცემთ უფრო იოლად მოაშოროთ მიწა ფესვებს.
კარგად განსაზღვრეთ რა ზომის მიწის და ფესვების ბოლქვი უნდა შევუნარჩუნოთ მცენარეს იმისთვის, რომ ის თქვენს მიერ შერჩეულ კონტეინერში ჩაეტიოს. გააკეთეთ ისე რომ, ზედმეტი მიწის მოშორების და ფესვების შეკრეჭის შემდეგ, კონტეინერში საკმარისი ადგილი იყოს ახალი მიწისთვის. ამის გაკეთება პირველივე ცდაზე შეიძლება არ გამოვიდეს. ამიტომ როდესაც გარკვეულ რაოდენობის მიწას და ფესვებს მოაშორებთ, ჩადეთ მცენარე კონტეინერში, დააკვირდით, განსაზღვრეთ კიდევ რა რაოდენობის მიწის და ფესვების მოშორება დაგჭირდებათ, რომ მცენარე ზუსტად ისე “მოერგოს” კონტეინერს როგორც ჩაფიქრებული გაქვთ. ამის გასაკეთებლად შეიძლება რამდენიმე ცდა კიდევ დაგჭირდეთ.
მიწის მოშორება ხდება ძალიან ფრთხილად. წვრილი ფესვები, რომლებიც უზრუნველყოფენ მცენარეს საკვები ნივთიერებით, იოლად ზიანდება. მართალია კონტეინერში ჩარგვის წინ, ფესვების გარკვეული რაოდენობა უნდა შევაჭრათ, მაგრამ გაუფრთხილებლობით და სიჩქარით შეიძლება ის ფესვებიც დავაზიანოთ რომელიც აუცილებელია მომავალი ბონსაისთვის. მიწის მოშორების შემდეგ დარჩენილ ფესვებს ვამოკლებთ ისე, რომ მიწის ბოლქვის გარეთ სულ რამდენიმე მილიმეტრით დარჩეს გამოშვერილი. მსხვილი ფესვების შეკრეჭისას გამოიყენეთ კარგად ალესილი მაკრატელი, რადგან გადაჭრის ადგილი გლუვი უნდა იყოს. აუცილებლად შეაჭერით ყველა გაფუჭებული ფესვი. მსხვილი ფესვი ისე უნდა გადაჭრათ, რომ გადაჭრის ადგილი ქვემოთ იყოს მიმართული. ახალი წვრილი ფესვები გადაჭრის ადგილზე ასე უკეთესად გაიზრდება. როდესაც საჭირო რაოდენობის ფესვები შეკრეჭილია, ვიწყებთ მცენარის მოთავსებას კონტეინერში. იმ ადგილას სადაც მცენარე უნდა ჩაირგეს, ვაკეთებთ ბორცვივით პატარა ამაღლებას მიწისგან. ვდებთ ზემოდან მცენარეს და აქეთ-იქით ნახევრად წრიული მოძრაობით ფრთხილად ვაწვებით, ამაღლებული მიწა თანაბრად რომ განაწილდეს ფესვების ქვეშ. შემდეგ, ხვრელებში გაყრილ მავთულს ვახვევთ მცენარის ტანზე ან რომელიმე დიდ ფესვზე და მყარად ვაფიქსირებთ.
Attention should also be paid to the depth of planting in the container. The plant should not be planted too deeply, nor should it be planted in such a way that the surface roots remain significantly above the container's edge.
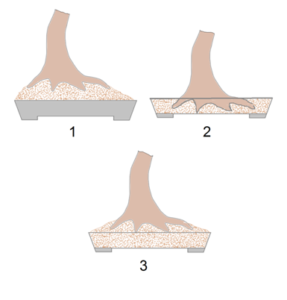
შემდეგ ვიწყებთ კონტეინერში თავისუფალი ადგილის მიწით შევსებას. ბოლქვის ქვეშ სიცარიელე რომ არ დარჩეს, საჭიროა წვეტიანი ჯოხით მიწა ბოლქვის გარშემო კარგად ჩაიჩხვლიტოს. ეს იმისთვისაა საჭირო, რომ ფესვებს შორის არ დარჩეს სიცარიელე, რამაც შემდგომში შეიძლება ფესვების გარკვეული რაოდენობის გაფუჭება გამოიწვიოს.
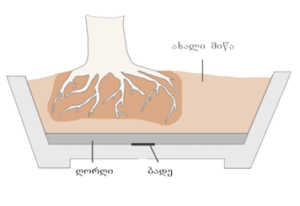
სხვადასხვა მიზეზების გამო, გადარგვისას საჭირო ხდება ფესვების მთლიანად გათავისუფლება მიწისგან. მიწის მთლიანად მოშორების გასაადვილებლად შესაძლებელია ფესვები წყლის ჭავლით გაირეცხოს. კონტეინერის მომზადება (ღორღი, ბადე სადრენაჟე ხვრელებზე დასამაგრებელი მავთული, პირველი ფენა მიწა), ანალოგიურად ხდება, როგორც მცენარეზე რომელსაც მიწის ბოლქვი შენარჩუნებული აქვს. მცენარის ფესვების სასურველ ზომამდე დამოკლების შემდეგ, ფრთხილად განაცალკევეთ ერთმანეთში გადახლართული ფესვები, გაშალეთ ყველა მიმართულებით და ჩადეთ კონტეინერში შესაფერის ადგილას. დააფიქსირეთ ნერგი მავთულით და შეავსეთ კონტეინერი მიწით. როდესაც მთლიანად შეავსებთ კონტეინერს, ვიღებთ წაწვეტებულ ჯოხს და ფრთხილად, ნელ-ნელა ვჩხვლეტთ ფესვების ზემოდან და გარშემო.
წიწვოვან მცენარეებზე, ფესვებიდან მიწის მთლიანი მოშორება და წყლის ჭავლით გარეცხვა, როგორც წესი არ კეთდება, ამან შესაძლოა მცენარის გახმობა გამოიწვიოს. როდესაც ყველაფერს დაამთავრებთ მცენარე უნდა მოირწყას. ამისათვის უნდა ჩავდოთ მცენარე უფრო დიდ და ღრმა ჭურჭელში ვიდრე კონტეინერია და დავასხათ იმდენი წყალი რომ კონტეინერის ზედაპირი დაფაროს. წყლის ზედაპირზე ჰაერის ბუშტულები დაიწყებს ამოსვლას. 2-3 წუთის შემდეგ ბუშტულების ამოსვლა შეწყდება. ეს იმის მაჩვენებელია რომ მიწა კონტეინერში მთლიანად დასველდა. ამოვიღოთ მცენარე წყლიდან და მოვათავსოთ ქარისგან და მზისგან დაცულ ადგილას. არასოდეს დატკეპნოთ მიწა მორწყვის შემდეგ.

თუ ახლად გადარგული მცენარე საკმაოდ დიდია და მძიმე, მაშინ აიღეთ სარწყავი, რომლიდანაც წყლის ნაკადი წვრილად გადმოედინება და უხვად მორწყეთ მცენარე. გადარგვისას, დიდი ყურადღება მიაქციეთ ფესვების შეკრეჭას. ძალიან მნიშვნელოვანია დაიცვათ ბალანსი ფესვების რაოდენობასა და ვარჯს შორის. ფესვების რაოდენობის შემცირებას ნუ ეცდებით მხოლოდ იმის გამო რომ მცენარე თქვენს მიერ შერჩეულ კონტეინერში არ ეტევა. ზედმეტი რაოდენობის ფესვების შეკრეჭამ შეიძლება მცენარე ვეღარ უზრუნველყოს საკმარისი საკვები ნივთიერებით.
განსაკუთრებით დიდი სიფრთხილეა საჭირო წიწვოვანი მცენარეების გადარგვისას. ფოთოლმცვივან მცენარეებთან შედარებით წიწვოვანები უფრო ძნელად იტანს დიდი რაოდენობით ფესვების შეკრეჭას. საერთოდ მიღებულია რომ გადარგვისას წიწვოვან მცენარეზე არსებული ფესვების მოცულობის მხოლოდ 1/3 უნდა შეაჭრათ. მაგრამ ეს არ არის რაღაც აუცილებელი დოგმა, რომლის დარღვევაც არ შეიძლება. გამოცდილი სპეციალისტი თვალით ატყობს თუ რა რაოდენობის ფესვების შეკრეჭა შეიძლება ამა თუ იმ სიტუაციაში. თუ აუცილებელია ფესვების დიდი რაოდენობით შეკრეჭა, ეცადეთ რომ ვარჯის მოცულობაც პროპორციულად შეამციროთ. კონტეინერში შეიძლება უკვე ფორმირებული მცენარე გადავრგოთ, ან გადავრგოთ ნერგი და კარგად გაფესვიანების შემდეგ, როდესაც მცენარე უკვე მყარად დგას, დავიწყოთ მისი ფორმირება.
Transplanting from one container to another
At a certain point, it becomes necessary to replant the bonsai. This need arises from several factors:
- The soil has been depleted and no longer contains enough nutrients;
- The plant's roots have grown to such an extent that there is no longer enough space for their development;
- The bonsai has grown, and its shape and dimensions no longer fit the size of the container.
პირველ ორ შემთხვევაში, თუ მცენარის ზომა საშუალებას გვაძლევს, შეიძლება ბონსაი იგივე კონტეინერში ხელახლა ჩავრგოთ ფესვების შეკრეჭის და მიწის გამოცვლის შემდეგ. პერიოდი როცა ბონსაის გადარგვა აუცილებელი ხდება ყველა მცენარეს ინდივიდუალური აქვს. წიწვოვანი ხეების ფესვები ფოთოლმცვენებზე უფრო ნელა იზრდება. მათი გადარგვა ხდება 3-5 წლის შემდეგ. ზოგიერთი ფოთოლმცვივანი მცენარის ფესვები ისე მალე ავსებს კონტეინერს რომ მათი გადარგვა ყოველ წელს არის აუცილებელი. საერთოდ ახალგაზრდა ხეებს (10 წლამდე ასაკის) უფრო მალ-მალე სჭირდება გადარგვა ვიდრე ასაკოვან მცენარეებს.

If you notice that the bonsai has grown to the point where the container size is no longer proportional to the plant, then you need to choose a larger container and transplant the bonsai into it. In this case as well, the timing for changing the container depends on the plant's growth characteristics. The procedure for transplanting from one container to another is the same as when the plant is first placed in a container.
Time to repot
Transplanting of plants is done in late autumn or early spring, during the dormant period. If you transplant the bonsai in late autumn, the main concern will be protecting the plant from winter frost and wind. If you transplant it in early spring, make sure to keep it out of direct sunlight for a period of time. One week after the buds begin to grow, take the bonsai outside for a short time (1 hour) in the sun. After that, gradually increase the time it spends in the sun each day. After a month, you can place it in its permanent location.
Most species of coniferous plants are transplanted in early spring, when new buds begin to develop.
Moss
After transplanting, it is essential to take care of the surface of the soil in the container. The surface should be leveled and cleaned. Some specialists try to cover the surface with a decorative layer. They use finely crushed stones or marble for this. However, in my opinion, the most suitable surface for bonsai is one covered with moss. Moss looks quite attractive and natural in the container and does not hinder the water from reaching the soil when watering. At the same time, it helps maintain moisture and prevents soil erosion from the surface, both during watering and on rainy days.
Since the soil in the container is constantly (more or less) wet, the surface often naturally gets covered with moss. However, it is also possible to "artificially" cover the surface with moss. You can find moss in damp and shaded areas: it grows on building walls, stones, or asphalt. Carefully remove the moss with a knife and remove as much excess soil as possible. Just before use, place the collected moss in a container and add water. Wet moss is easier to apply to the surface. Gently arrange small pieces of moss around the plant, placing them close together with no gaps, and press them down lightly. Under no circumstances should you cover the surface roots with moss.
ასევე შესაძლებელია შეგროვებული ხავსი 2-3 კვირით ჩრდილში გაახმოთ. წვრილად დაფშვნათ, შეურიეთ მიწის მცირე რაოდენობა და ძალიან თხელ ფენად მოაყაროთ მიწის ზედაპირს. რეგულარული მორწყვისას, სულ 1-2 კვირაში ხავსი ისევ “გაცოცხლდება”.

