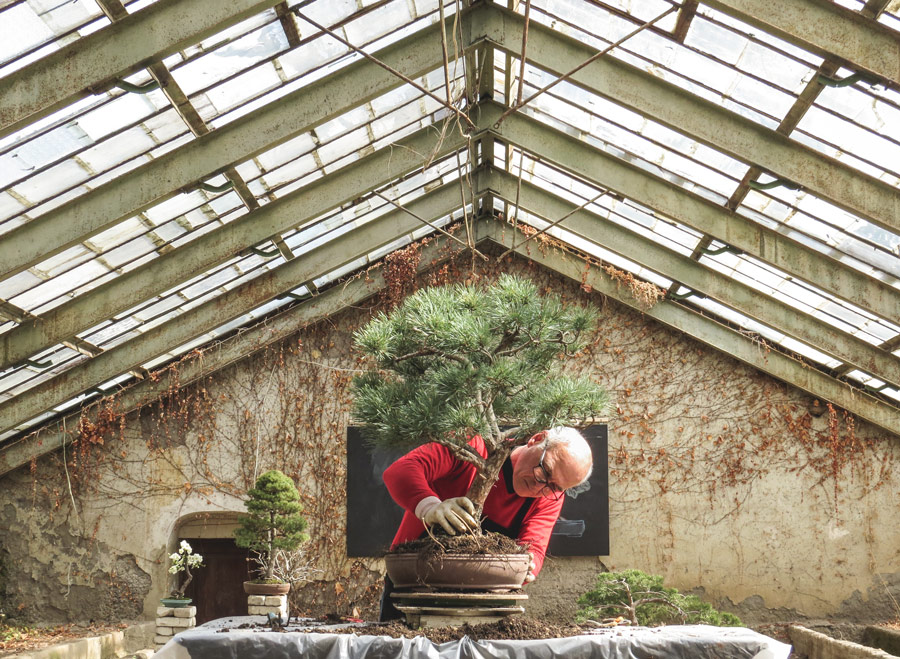
The first planting in the container
დიდი ჭურჭლიდან ან გრუნტიდან კონტეინერში პირველად გადარგვა ერთი შეხედვით არც თუ ისე რთულია, მაგრამ ჩვენ საქმე მინიატურულ მცენარესთან გვაქვს, რომლის თითოეულ პატარა დეტალსაც კი გადამწყვეტი მნიშვნელობა აქვს. გადარგვის დაწყებამდე უნდა შევარჩიოთ შესაფერისი კონტეინერი და უნდა ვიცოდეთ რა რაოდენობის ფესვების შეკრეჭა მოგვიწევს, რომ ნერგი ზუსტად ისე მოთავსდეს კონტეინერში როგორც ჩავიფიქრეთ. ძალიან ხშირად, კონტეინერში პირველად გადარგვის დროს, ყველაფერი ზუსტად ისე არ გამოდის როგორც დაგეგმილი იყო. შესაძლოა ვერ მოხერხდეს საჭირო რაოდენობის ფესვების შეკრეჭა კონტეინერში მოსათავსებლად, ან მიხვდეთ რომ ლამაზი ბონსაის მისაღებად საჭირო ხდება მცენარის ფორმის და ზომის სერიოზული კორექტირება. ყოველივე ამისთვის მზად უნდა იყოთ, ეცადეთ მოძებნოთ შექმნილი სიტუაციიდან ოპტიმალური გამოსავალი.
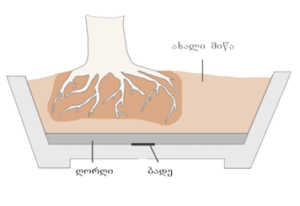
გადარგვის დასაწყებად მოვამზადოთ შესაბამისი კონტეინერი, საჭირო რაოდენობის მიწა, ინსტრუმენტები და დამხმარე მასალები. პირველ რიგში, მორწყვისას მიწა რომ არ გამოირეცხოს, კონტეინერის სადრენაჟე ხვრელები უნდა დაიფაროს მეტალის ან პლასტმასის წვრილი ბადით. კონტეინერის მიწით შევსებისას ბადე თავის ადგილიდან რომ არ დაიძრას, საჭიროა დავაფიქსიროთ მავთულის საშუალებით.
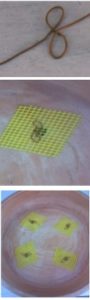
After transplanting, until the plant is well-rooted, it is essential that the bonsai is firmly secured in the container. To do this, thread a wire through the drainage holes from the bottom, which will be used to fix the newly transplanted plant in place. This wire is only temporary; once the plant is well-rooted, the wire should be removed. If there is only one drainage hole, or if you find that you cannot pass the wire through the drainage holes in the required position, it is better to make additional small holes in the container for the securing wire. After this, spread a 1-1.5 cm layer of fine gravel on the bottom of the container to improve drainage, and only then add the first layer of soil.
Next stage: We choose the spot in the container where the plant should be placed. In rectangular and oval containers, the plant is planted at the intersection of 1/3 of the container's length and 1/2 of its width. In the case of the SHAKAN style, the lean should be toward the 2/3 side of the container. In CHOKAN and MOYOGI styles, the lowest, longest branch should be positioned over the 2/3 portion of the container's length.
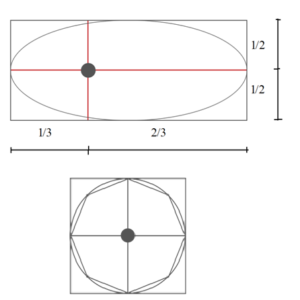
In round, polygonal, and square containers, the plant is placed in the center. Bonsai is also planted in the center in tall containers for HAN-KENGAI and KENGAI styles. When you plan a transplant, be sure to consider the moisture level of the soil in which the plant is currently planted. It is bad when the soil is too wet. At such times, it is quite difficult to remove excess soil from the roots. Therefore, try not to water the plant for a few days before transplanting. Transplanting usually takes place during the dormancy period, and the plant will not suffer any harm if you do not water it for a few days.
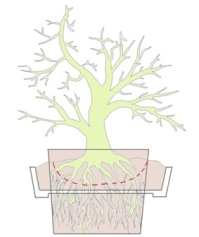
How to remove the plant from a large vessel: First, cut off the roots that have grown outside the root ball. Then, begin removing the soil. For this, use a root rake (three-prong tool) and a pointed wooden stick. Poke the pointed stick into the soil from above in various places. This will gradually loosen the soil, allowing you to remove it from the roots more easily.
Carefully determine what size of soil and root ball should be maintained so that the plant fits into your selected container. Ensure that after removing excess soil and pruning the roots, there is enough space in the container for new soil. This may not work out on the first try. Therefore, once you have removed a certain amount of soil and roots, place the plant in the container, observe, and determine how much more needs to be removed so that the plant "fits" the container exactly as you envisioned. You may need several more attempts to achieve this.
Soil removal must be done very carefully. The fine roots, which provide the plant with nutrients, are easily damaged. Although a certain amount of roots must be pruned before planting in the container, carelessness and haste can damage the very roots that are essential for the future bonsai. After removing the soil, shorten the remaining roots so that only a few millimeters protrude beyond the soil ball. When pruning thick roots, use well-sharpened shears, as the cut surface must be smooth. Be sure to cut off all damaged roots. A thick root should be cut in such a way that the cut surface faces downward; new fine roots will grow better from the cut site this way. Once the required amount of roots is pruned, we begin placing the plant in the container. At the spot where the plant is to be planted, create a small mound of soil. Place the plant on top and press down carefully with semi-circular movements to ensure the mounded soil is distributed evenly under the roots. Then, wrap the wire threaded through the holes around the trunk or a large root and secure it firmly.
Attention should also be paid to the depth of planting in the container. The plant should not be planted too deeply, nor should it be planted in such a way that the surface roots remain significantly above the container's edge.

Then, we begin filling the remaining empty space in the container with soil. To ensure no hollow spaces remain under the root ball, it is necessary to poke the soil around the ball thoroughly with a pointed stick. This is required so that no air pockets are left between the roots, which could otherwise cause a certain amount of the roots to decay later on.
For various reasons, during transplanting, it may become necessary to completely free the roots from the soil. To make the total removal of soil easier, the roots can be washed with a stream of water. Preparing the container (gravel, mesh, wire for drainage holes, and the first layer of soil) is done in the same way as for a plant where the root ball is maintained. After shortening the plant's roots to the desired size, carefully separate any intertwined roots, spread them out in all directions, and place them in the appropriate spot in the container. Secure the seedling with wire and fill the container with soil. Once the container is completely filled, take a pointed stick and carefully, bit by bit, poke the soil from above and around the roots.
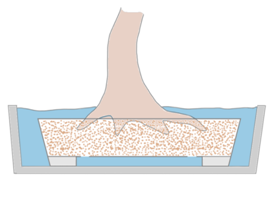
On coniferous plants, completely removing the soil from the roots and washing them with a water jet is usually not done, as this may cause the plant to wither. When you have finished everything, the plant must be watered. To do this, place the plant in a vessel larger and deeper than the container and pour enough water to cover the surface of the container. Air bubbles will begin to rise to the surface of the water. After 2-3 minutes, the bubbling will stop. This is an indicator that the soil in the container is completely saturated. Remove the plant from the water and place it in a location protected from wind and sun. Never compact the soil after watering.
If the newly transplanted plant is quite large and heavy, then take a watering can from which the water flows in a fine stream and water the plant abundantly. During transplanting, pay close attention to root pruning. It is very important to maintain a balance between the volume of roots and the crown. Do not attempt to reduce the number of roots solely because the plant does not fit into your chosen container. Pruning an excessive amount of roots may result in the plant being unable to provide itself with sufficient nutrients.
Extra care is needed when transplanting coniferous plants. Compared to deciduous plants, conifers tolerate the pruning of a large volume of roots with more difficulty. It is generally accepted that during transplanting, you should only prune 1/3 of the existing root volume on a coniferous plant. However, this is not an absolute dogma that cannot be broken. An experienced specialist can judge by eye how much root pruning is possible in a given situation. If it is necessary to prune a large number of roots, try to reduce the volume of the crown proportionally as well. You can transplant an already formed plant into the container, or transplant a seedling and start its formation after it is well-rooted and the plant is standing firmly.
Transplanting from one container to another
At a certain point, it becomes necessary to replant the bonsai. This need arises from several factors:
- The soil has been depleted and no longer contains enough nutrients;
- The plant's roots have grown to such an extent that there is no longer enough space for their development;
- The bonsai has grown, and its shape and dimensions no longer fit the size of the container.
In the first two cases, if the size of the plant allows, the bonsai can be replanted in the same container after pruning the roots and replacing the soil. The period when transplanting a bonsai becomes necessary is individual for every plant. The roots of coniferous trees grow more slowly than those of deciduous ones. Their transplanting occurs after 3–5 years. The roots of some deciduous plants fill the container so quickly that it is necessary to transplant them every year. Generally, younger trees (under 10 years of age) need to be transplanted more frequently than older plants.
If you notice that the bonsai has grown to the point where the container size is no longer proportional to the plant, then you need to choose a larger container and transplant the bonsai into it. In this case as well, the timing for changing the container depends on the plant's growth characteristics. The procedure for transplanting from one container to another is the same as when the plant is first placed in a container.
Time to repot
Transplanting of plants is done in late autumn or early spring, during the dormant period. If you transplant the bonsai in late autumn, the main concern will be protecting the plant from winter frost and wind. If you transplant it in early spring, make sure to keep it out of direct sunlight for a period of time. One week after the buds begin to grow, take the bonsai outside for a short time (1 hour) in the sun. After that, gradually increase the time it spends in the sun each day. After a month, you can place it in its permanent location.
Most species of coniferous plants are transplanted in early spring, when new buds begin to develop.
Moss
After transplanting, it is essential to take care of the surface of the soil in the container. The surface should be leveled and cleaned. Some specialists try to cover the surface with a decorative layer. They use finely crushed stones or marble for this. However, in my opinion, the most suitable surface for bonsai is one covered with moss. Moss looks quite attractive and natural in the container and does not hinder the water from reaching the soil when watering. At the same time, it helps maintain moisture and prevents soil erosion from the surface, both during watering and on rainy days.
Since the soil in the container is constantly (more or less) wet, the surface often naturally gets covered with moss. However, it is also possible to "artificially" cover the surface with moss. You can find moss in damp and shaded areas: it grows on building walls, stones, or asphalt. Carefully remove the moss with a knife and remove as much excess soil as possible. Just before use, place the collected moss in a container and add water. Wet moss is easier to apply to the surface. Gently arrange small pieces of moss around the plant, placing them close together with no gaps, and press them down lightly. Under no circumstances should you cover the surface roots with moss.
It is also possible to dry collected moss in the shade for 2-3 weeks. Finely crumble it, mix it with a small amount of soil, and spread it in a very thin layer over the soil surface. With regular watering, the moss will "come back to life" in just 1-2 weeks.